Introduction

Day 1
GBA Hardware

Day 2
"Hello, World!"

Day 3
Input

Day 4
Backgrounds -
  Bitmapped Modes

Day 5
Sprites

Day 6
Backgrounds -
  Tile Modes

Day 7
Project 1 -
  Tetris

Quiz - Week 1

Day 8
Sprites #2 -
  Animation

Day 9
Maps

Day 10
Sprites #3 -
  Animation #2

Day 11
Backgrounds -
  Rotation

Day 12
Sprites #4 -
  Mosaic

Version History

Downloads

Books

Links

Graphics FAQ

GFX2GBA Readme

Games

Projects

Credits

Support

HAM Tutorial :: Day 6 :: Backgrounds - Tile Modes


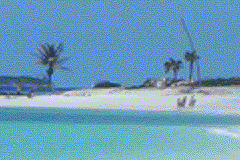
I think it's time to learn about the tile modes, Mode 0 - 2. Tile modes have been around for quite a while and they can be very useful. You start with a set of tiles, all of which are 8x8 pixel bitmaps. Then you have a map which is used to create a background out of those tiles.

For this tutorial, basically what I do is take a bitmap and break it into tiles and create a map with gfx2gba. These are then used to recreate the original bitmap. In most modes the screen is 240x160 pixels. This means there are 600 8x8 tiles (600 tiles * 8 pixels wide * 8 pixels high = 38400 pixels = 240 * 160 pixels). Think about that for a minute before you move on to make sure you understand what I mean.

For more information on tile-based graphics, check out these sites:
http://www.nonoche.com/imaging/en/
Tile Based Games FAQ
http://www.gamedev.net/reference/list.asp?categoryid=44

For this tutorial, I've created a picture called paradise.bmp (which I took on a trip to the Bahamas). Copy the file (or your own BMP) to the gfx directory.

Change to that directory and type:
gfx2gba -fsrc -m -pparadise.pal -t8 paradise.bmp
NOTE
: This is different from what we used on Day 4.
            -t8 means 8 pixel tiles, -m means map

I must stress again that you should take the time to read the Readme that comes with gfx2gba. It's a great program but you have to know what you are doing!

This will create three files:
paradise.pal.c
paradise.raw.c
paradise.map.c

Again, go ahead and take a quick peek at the files. The important thing about paradise.map.c is the name of the array that is created. It should be paradise_Map. The array created in paradise.raw.c is paradise_Tiles. You will see these names later in the tutorial program.

Speaking of which, let's go ahead and display that (tile mode) background.

 
// The Main HAM Library
#include <mygba.h>

// Graphics Includes
// Created using:
//   gfx2gba -fsrc -m -pparadise.pal -t8 paradise.bmp
#include "gfx/paradise.pal.c"
#include "gfx/paradise.raw.c"
#include "gfx/paradise.map.c"

// Function: main()
int main()
{
    // Variables
    map_fragment_info_ptr bg_paradise; // BG pointer

    // Initialize HAMlib
    ham_Init();

    // Setup the background mode
    ham_SetBgMode(1);

    // Initialize the background palette
    ham_LoadBGPal((void*)paradise_Palette,256);
	
    // Setup the tileset for our image
    ham_bg[0].ti = ham_InitTileSet((void*)paradise_Tiles,
            SIZEOF_16BIT(paradise_Tiles),1,1);
	
    // Setup the map for our image
    ham_bg[0].mi = ham_InitMapEmptySet(3,0);
    bg_paradise = ham_InitMapFragment((void*)paradise_Map,
            30,20,0,0,30,20,0);
    ham_InsertMapFragment(bg_paradise,0,0,0);
			
    // Display the background
    ham_InitBg(0,1,0,0);
	
    // Infinite loop to keep the program running
    while(1) {}

    return 0;
} // End of main()
 

Code Explanation

map_fragment_info_ptr bg_paradise;
This data type is used to store all the information about our background.
If you want to know more about it, here's a code snippet from mygba.h.
typedef struct map_fragment_info_typ
{
  u16* src; // location of this map (usually ROM/EXWRAM)
  u16* src_ofs; // location of the data start IN the map currently set
  u8 map_rot; // designates this map to be rotation type map
  u16 map_total_x; // actual map size in tiles / x
  u16 map_total_y; // actual map size in tiles / y
  u16 map_ofs_x; // offset into maps location start in tiles / x
  u16 map_ofs_y; // offset into maps location start in tiles / y
  u16 map_tiles_x; // actual map size (from offset on) in tiles / x
  u16 map_tiles_y; // actual map size (from offset on) in tiles / y
  u16 map_line_ofs; // offset that needs to be added after reading 1 line
  // of the map to reach next lines map_x
} map_fragment_info,*map_fragment_info_ptr;

ham_SetBgMode(1);
For this example we'll use Mode 1 . In this tile mode the screen is composed of 8x8 pixel squares. Backgrounds 0, 1, and 2 are available. Background 2 can be rotated or scaled.

ham_bg[0].ti = ham_InitTileSet( ... );
This loads our tileset to background 0. It is passed the address of the tileset, the size of the tiles to be copied in 16 bit chunks, the color mode, and cbb_only_mode. This last parameter is somewhat tricky - I recommend you use the default of 1 for now.

ham_bg[0].mi = ham_InitMapEmptySet(3,0);
This sets up an empty map linked to a background. Basically it just gets a map ready for the next function we'll call.

bg_paradise = ham_InitMapFragment(...)
This sets up a rectangular portion on our background into which we'll "paste" our data with the next function.

ham_InsertMapFragment(bg_paradise,0,0,0);
This actually copies the map from the fragment we just created into our empty background.

ham_InitBg(0,1,0,0);
This will actually draw the background. It is passed the background number you wish to initialize, whether the background is hidden or not, the priority of the background, and whether the background should be mosaic or not. If you have no't setup the .ti and .mi parameters, this will return an error.

Well, I don't think that was too difficult. Again, mess with the code and see what you can do before moving on to Day 7.


Download Code

NOTE: You may need to Right-click and choose Save As.

HAM Version 2.80 And Higher
Download All Files In One Zip: Day6_BGs_Tile_Modes.zip

View Demo Now

Discuss Day 6


<<

HOME

>>